I hadn’t realized that there were so many conflicting stories about the macaron's origin. Some who researched concluded that they have French origins, as one might expect, while others believe Italian. I also read of an Italian chef in a French kitchen.
One thing that we can all agree on is that this small two-bite sweet is unlike any other cookie. While its distinct almond flavour can be found in other recipes, the shape, uninspired, and buttercream centres are common. But a collection of favoured flavours and textures together in one tasty cookie is a mouth-watering delight. Especially at first bite when the crispness surprises you and the chewy finish pleases your palate as you first taste the flavoured cream filling, then the almond.
While they don’t look like much when so commonly presented without decoration, they are one of the most challenging cookies. Success is achieved baking a macaron when the feet are even in height around the bottom of each half, and the top has a smooth finish and breaks like an eggshell.
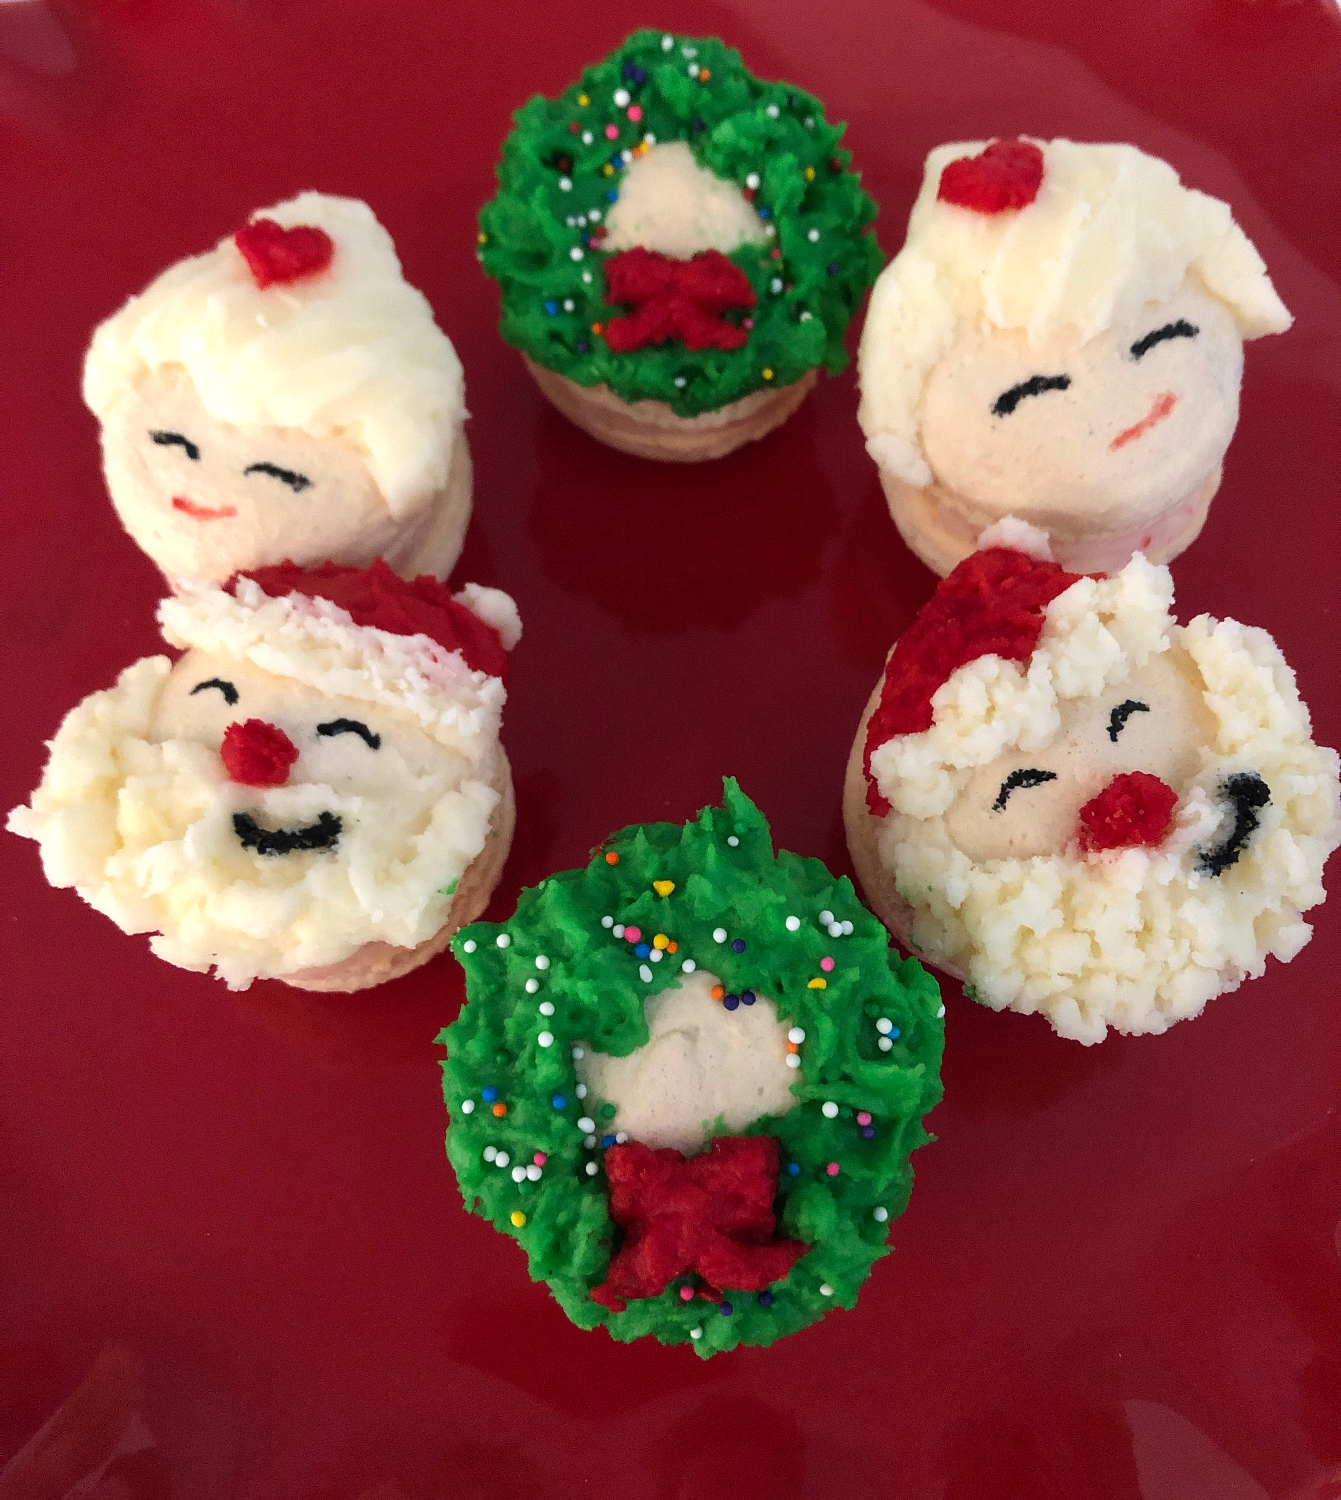
Everyone needs a little merriness to complete the season, so I added it to the tops of my macarons and filled each with one of the top favourite Christmas flavours, peppermint. I could have used peppermint extract for ease, but incorporating real candy cane is much more fun.
This recipe makes 36 macarons. All of the tops are done by hand. It can be fun to divide them up for family members to decorate alongside.
Remember not to expect to make the perfect macaron the first time. Making cookies for the holidays is all about the love and joy you bring to those you baked for.
Merry Macaron Recipe
PREPARATION TIME 2 hr 20 minutes YIELDS 36
Equipment
2 silicone macaron sheets with circles (available at Nicetys in Downtown Oakville), spatula, stand-up or hand mixer, teaspoon, tablespoon, measuring cup, medium mixing bowl, piping bag, 1M tip, medium round tip, 2 small bowls for coloured icing, wax paper, toothpicks, 2 cookie sheets
Ingredients
Cookie
3 egg whites, room temperature
1 ½ cups almond flour
½ cup granulated sugar
1 cup icing sugar
1 tsp vanilla
1/4 tsp cream of tartar
Buttercream
1 cup butter
2 Tbsp milk
1 tsp vanilla
5 cups icing sugar
Food colouring - red, green, black
1 ¼ cups crushed candy canes (a spoon and a plastic ziplock is effective)
Instructions
Step 1
Sift 1 cup of icing sugar and almond flour into a mixing bowl, and combine. Beat the egg whites on high in a mixer until foamy. Add the cream of tartar, and then slowly add the granulated sugar. Finally, add 1 teaspoon of vanilla.
Beat until stiff peaks form. With the mixer off, gently fold the dry ingredients with a spatula until thoroughly combined.
Transfer the mixture to the prepared piping bag. On the underside of the silicone sheet, apply a dot of batter to each corner to avoid corners rising during the bake.
Start in the circle's centre on each outline of the silicone sheet. Squeeze the batter until the batter reaches the ring edge, making sure to keep the tip in the batter until each circle is finished. This helps to avoid peaks in the centre.
When the sheets are full, with a damp finger, touch any peaks to give them that little nudge to flatten while baking. With both hands, tap the cookie sheet down on the counter to help any air bubbles escape. Let the circles rest for 45 minutes.
Bake at 300℉ for 15 minutes, rotating the sheets halfway through the bake. Cool completely before removing the cookie halves from the silicone sheets.
Step 2
In a mixing bowl, cream the butter. Turn the speed to low, then slowly add milk and 5 cups of icing sugar. When the sugar is thoroughly moistened, increase the speed and beat for 1 minute on medium-high. Add vanilla until incorporated.
Remove a ⅓ of the icing and divide that ⅓ into 2 small bowls.
Squeeze a teaspoon of red food colouring into 1 dish and green into the other. Adjust for the desired hue. I used a toothpick for black. These designs for the tops of the cookies were done by hand. No tools were used except for toothpicks.
Step 3
Pour the crushed peppermint into the remaining ⅔ of the icing and mix thoroughly by hand. Spoon the icing into the prepared piping bag.
Pipe in a circular motion to the centre. Test the first cookie to get a feel of the pressure to add to the piping. When the decorated top and piped bottom come together, you want to see the icing at the edge but not pushing over the edge. Pipe the rest, join them together with the decorated tops and enjoy!